Part 5: TouchGFX Designer
TouchGFX applications are modeled after Model-View-Presenter design pattern.
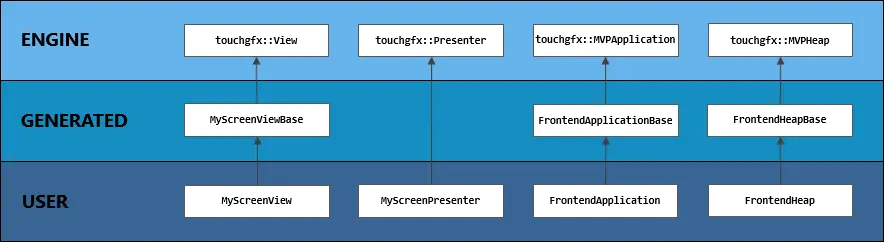
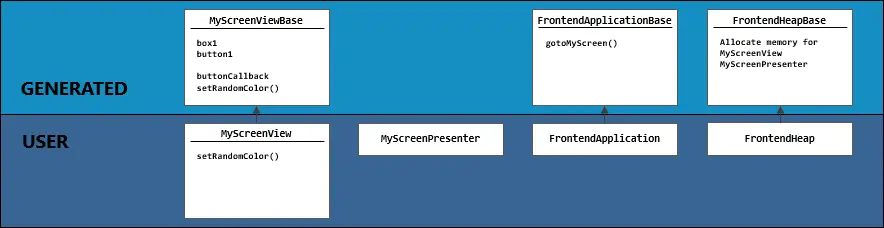
TouchGFX Designer (re)generates code that provides base classes. User classes are derived from these base classes and implement the graphical interface and business logic. We may only edit the code in /TouchGFX/gui/ and provide needed assets in /TouchGFX/assets/, since these are guaranteed to never be overwritten.
FrontendApplication.cpp is the entry point to our graphical application. We will implement initialization of dynamic bitmap cache and debug printer in it.
Dynamic bitmaps are a way to create and write to a bitmap at runtime in TouchGFX. Its pixel memory is allocated from the bitmap cache, which we must first initialize.
Static bitmaps on the other hand are compiled into the application and must be available at compile time. We did this with texture atlas in Part 4.
We will need two dynamic bitmaps - one for the minimap, one for the raycasting algorithm.
constexpr short bitmapCount = 2;
constexpr short overhead = (sizeof(Bitmap) + sizeof(Bitmap::BitmapData) + sizeof(Bitmap::CacheTableEntry) + sizeof(Bitmap::DynamicBitmapData)) * bitmapCount;
constexpr uint32_t cacheSize =
    KrisRaycaster::SCREEN_WIDTH *
    KrisRaycaster::SCREEN_HEIGHT *
    sizeof(uint16_t) *
    bitmapCount +
    overhead;
uint16_t *const cacheAddr = static_cast<uint16_t*>(malloc(cacheSize));
Bitmap::setCache(cacheAddr, cacheSize, bitmapCount);
The constants KrisRaycaster::SCREEN_WIDTH and KrisRaycaster::SCREEN_HEIGHT are set to be one half of the screen (left half is minimap, right half is first-person game view.)
This is the only dynamic memory allocation we will be performing in this application. TouchGFX by design is statically allocated in memory, so if the app runs on startup, it will be guaranteed to be always able to fit into memory.
We will use the debug printer to display FPS and frametime on the display.
lcd16DebugPrinter.setColor(0xffffff);
lcd16DebugPrinter.setPosition(KrisRaycaster::SCREEN_WIDTH + 10, 10, 240, 40);
lcd16DebugPrinter.setScale(3);
Application::setDebugPrinter(&lcd16DebugPrinter);A screen in TouchGFX is a logical grouping of UI elements and their associated business logic. We will only need one - GameScreen.

We now need to create the dynamic bitmaps we have allocated the cache memory for.
void GameScreenView::setupScreen()
{
    GameScreenViewBase::setupScreen();

    // Map bitmap setup
    mapBmpId = Bitmap::dynamicBitmapCreate(KrisRaycaster::SCREEN_WIDTH, KrisRaycaster::SCREEN_HEIGHT, Bitmap::RGB565);
    // check if (mapBmpId == BITMAP_INVALID)...
    memset(
        Bitmap::dynamicBitmapGetAddress(mapBmpId),
        0,
        KrisRaycaster::SCREEN_WIDTH * KrisRaycaster::SCREEN_HEIGHT * sizeof(uint16_t)
    );
    // Map image setup
    Bitmap mapSource(BITMAP_WALL_ID);
    const uint16_t* sourceData = (const uint16_t*)mapSource.getData();
    uint16_t* destData = (uint16_t*)Bitmap::dynamicBitmapGetAddress(mapBmpId);
    if (!(sourceData && destData))
    {
        touchgfx_printf("Failed to get source and destination data\n");
    }
    else
    {
        Raycaster::initMap(
            sourceData,
            destData,
            Vec2{ mapSource.getWidth(), mapSource.getHeight()},
            Vec2{KrisRaycaster::SCREEN_WIDTH, KrisRaycaster::SCREEN_HEIGHT}
        );
    }
    mapImg.setBitmap(Bitmap(mapBmpId));
    mapImg.setXY(0, 0);
    mapImg.setAlpha(255);
    mapImg.setWidthHeight(KrisRaycaster::SCREEN_WIDTH, KrisRaycaster::SCREEN_HEIGHT);
    add(mapImg);

    // Repeat the same for raycasting bitmap...
}playerIndicator = touchgfx::Box(10, 10, 0xFF0000, 255);
playerIndicator.setXY(0, 0);
add(playerIndicator);The minimap will always stay fixed, the only dynamic thing is a red square represeting current player position on the map.
TouchGFX provides us with a handleTickEvent event handler, which is called in every frame, synchronized with clock cycle of the display.
Every frame, we will re-render first-person raycasting view, player position on the map and the FPS label.
void GameScreenView::handleTickEvent()
{
    uint8_t *gameFb = Bitmap::dynamicBitmapGetAddress(gameBmpId);
    Raycaster::movePlayer(static_cast<float>(playerDir));
    Raycaster::render(gameFb);

    const Rect& playerRect = playerIndicator.getRect();
    Rect mapRect = Rect(playerRect.x, playerRect.y, playerRect.width, playerRect.height);
    mapImg.invalidateRect(mapRect);
    Vec2 boxPx = Raycaster::playerPos.toScreenSpace();
    playerIndicator.setXY(boxPx.x - playerRect.width / 2, boxPx.y - playerRect.width / 2);
    playerIndicator.invalidateContent();
    gameImg.invalidate();

    short fps = 60 / HAL::getInstance()->getLCDRefreshCount();
    short ms = static_cast<short>(round((1000.0f / fps)));
    snprintf(debugStringBuffer, sizeof(debugStringBuffer), "%d fps (%d ms)", fps, ms);
    Application::getDebugPrinter()->setString(debugStringBuffer);
    Application::invalidateDebugRegion();
}
TouchGFX by default only re-renders the areas which need to be updated. To request a redraw, we must call .invalidate() upon widgets.
To avoid having to flash the memory each time we compile the application, which is slow and wears down embedded flash, we can use the simulator provided by TouchGFX Designer. Click the middle button to open it.

You can also use the simulator in Visual Studio and use its debugging capabilites, which I found very convenient.
Open the Visual Studio project located in src\stm32\KrisRaycaster\TouchGFX\simulator\msvs.

You may also find using touchgfx_printf() very convenient. It will display messages in the debug console in the simulator, but is defined as an empty macro on a real STM32, which will generate no code and hence has no performance penalty.
Press the rightmost button to flash program to embedded memory. If you have a different board than mine, you will have to edit build settings in TouchGFX Designer. I recommend you copy build settings from one of the example projects provided by TouchGFX, which will be auto-generated to work on your board. Afterwise you can tailor the defaults to your needs.