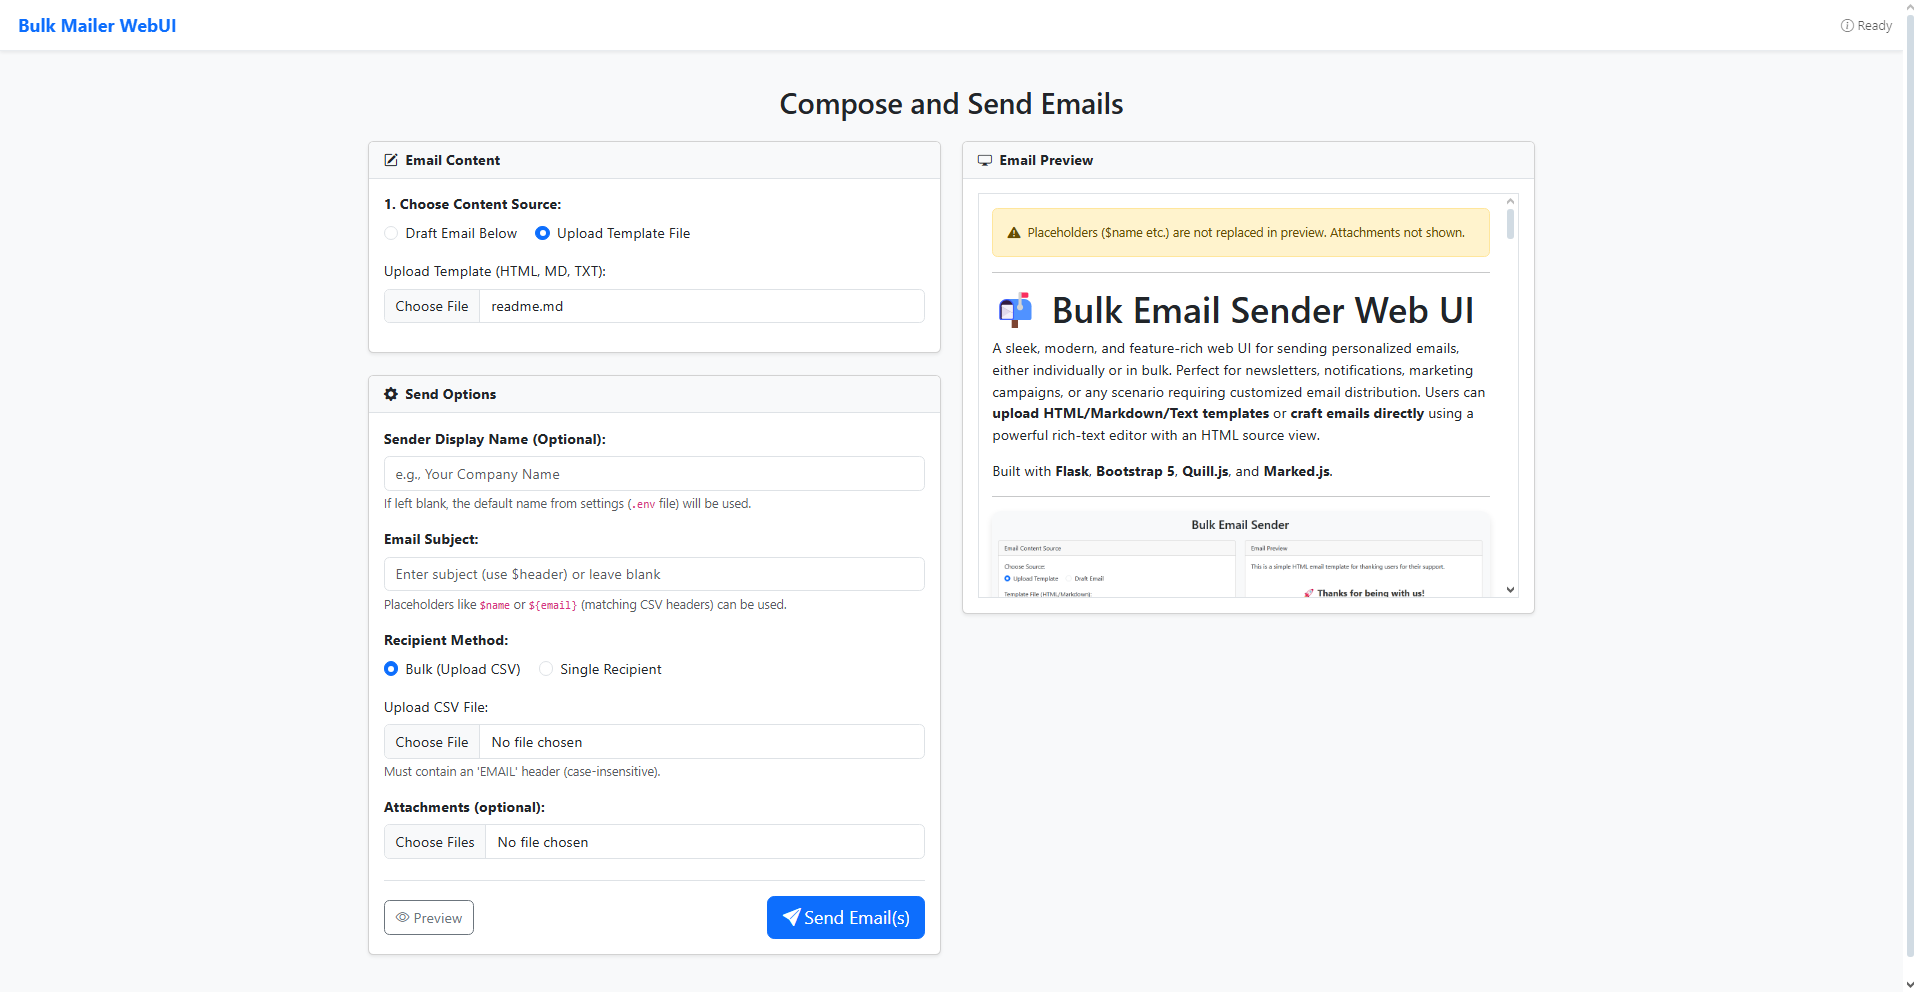
A sleek, modern, and feature-rich web UI for sending personalized emails, either individually or in bulk. Perfect for newsletters, notifications, marketing campaigns, or any scenario requiring customized email distribution. Users can upload HTML/Markdown/Text templates or craft emails directly using a powerful rich-text editor with an HTML source view.
Built with Flask, Bootstrap 5, Quill.js, and Marked.js.
- ⚙️ Flexible Email Content Creation:
- Upload Templates: Use existing
.html,.htm,.md, or.txtfiles. Markdown is automatically converted to HTML. Plain text is wrapped nicely. - Draft In-App: Utilize the Quill Rich Text Editor for easy formatting or switch to the HTML Source tab for precise control.
- Upload Templates: Use existing
- 📧 Multiple Recipient Modes:
- Bulk Sending: Upload a
.csvfile. Requires an email column (looks foremail,email address, etc., case-insensitive). - Single Recipient: Quickly send a test or one-off email by typing the address directly.
- Bulk Sending: Upload a
- 🎨 Dynamic Personalization:
- Use placeholders like
$nameor${header}in your subject and email body (matching your CSV column headers) for personalized messages. (See 'Using Variables' section below)
- Use placeholders like
- 🖼️ Live Email Preview:
- Instantly see how your drafted or uploaded content will render before sending. (Note: Placeholders are not substituted in the preview).
- 📎 Attachment Support:
- Easily attach one or more files to your emails.
- 👤 Custom Sender Name:
- Optionally override the default sender display name (set in
.env) for specific campaigns.
- Optionally override the default sender display name (set in
- ✉️ HTML & Plain Text:
- Automatically generates both HTML and plain text versions of your email for compatibility across different email clients using
html2text.
- Automatically generates both HTML and plain text versions of your email for compatibility across different email clients using
- 🔐 Secure Configuration:
- Keep your SMTP credentials safe using a
.envfile. No hardcoding needed. - Supports standard SMTP servers and ports, including TLS.
- Keep your SMTP credentials safe using a
- 📊 Detailed Results & Logging:
- Redirects to a results page after sending, showing a summary (Sent, Failed, Skipped) and a detailed log for each attempted email.
- Clear success/failure/info icons for quick status assessment.
- 💡 Smart & Responsive UI:
- Built with Bootstrap 5 for a clean look on all devices.
- Form sections dynamically show/hide based on selected options.
- Navbar status indicator provides real-time feedback during processing and shows the final result.
- Loading indicator prevents accidental double-sends.
- ✅ Robust Error Handling:
- Validates file types, checks for required inputs, handles CSV parsing errors, and provides informative SMTP error messages.
- Backend: Flask (Python)
- Frontend: HTML, CSS, JavaScript
- Styling: Bootstrap 5, Bootstrap Icons
- Rich Text Editor: Quill.js
- Markdown Parsing: Marked.js (Frontend Preview), Python-Markdown (Backend Processing)
- Email Generation: Standard Python
emaillibrary,smtplib - HTML to Text:
html2text - Environment Variables:
python-dotenv
Follow these steps to get the application running on your local machine.
- Python: Version 3.7 or newer recommended (due to Flask 2.x+ dependencies).
- pip: Python package installer (usually comes with Python).
- Git: For cloning the repository.
- (Optional but Recommended) A Python virtual environment manager (
venv).
-
Clone the Repository:
git clone https://github.com/SupratimRK/web-bulk-email-sender.git cd web-bulk-email-sender -
Create and Activate a Virtual Environment:
- macOS / Linux:
python3 -m venv venv source venv/bin/activate - Windows (Command Prompt/PowerShell):
python -m venv venv
.\venv\Scripts\activate
(Your terminal prompt should now indicate you're in the
(venv)) - macOS / Linux:
-
Install Dependencies:
pip install -r requirements.txt
-
Configure Environment Variables:
- Copy the example file:
(On Windows, you might use
cp .env.example .env
copy .env.example .env) - Edit the
.envfile with your actual SMTP credentials and desired default display name. See the section below for details.
- Copy the example file:
Create a file named .env in the project root directory (where app.py is located) and add the following variables:
# .env - DO NOT COMMIT THIS FILE TO GIT!

# Display Name shown in the 'From' field by default (can be overridden in UI)
display_name="Your Default Sender Name"

# Your sending email address (must match SMTP login)
sender_email="[email protected]"

# Your email account password or an App Password (Recommended!)
password="your_password_or_app_password"

# SMTP Server Configuration (Examples below)
MAILER_HOST="smtp.yourprovider.com" # e.g., smtp.gmail.com, smtp.mailersend.net
MAILER_PORT="587"                   # Common ports: 587 (TLS), 465 (SSL), 25 (Insecure)

# Flask Secret Key (for session management, flash messages)
# Change this to a random string for better security
FLASK_SECRET_KEY="a_default_but_less_secure_key_please_change_me"
Important Notes:
- Security: NEVER commit your
.envfile to version control (Git). The.gitignorefile should ideally prevent this, but always be cautious. - App Passwords: If using Gmail or some other providers, it's highly recommended (or required) to enable 2-Factor Authentication (2FA) and generate an App Password specifically for this application instead of using your main account password.
- SMTP Settings: Ensure
MAILER_HOSTandMAILER_PORTare correct for your email provider. The code currently uses STARTTLS for port 587. If using port 465 (implicit SSL), thesmtplib.SMTP_SSLclass might be needed instead (requires code adjustment).
-
Start the Flask Application:
python app.py
The application will start, usually on
http://127.0.0.1:5000/orhttp://0.0.0.0:5000/(accessible on your local network). Open the URL in your web browser. -
Choose Content Source:
- Select "Draft Email Below" to use the editor.
- Select "Upload Template File" to browse for an
.html,.md, or.txtfile.
-
Create/Upload Email Content:
- If Drafting: Use the Rich Text Editor or switch to the "HTML Source" tab.
- If Uploading: Select your template file.
-
Set Subject & Sender Name:
- Enter the Email Subject. You can use placeholders here (e.g.,
Welcome, $name!). See "How the Subject is Determined" below. - Optionally, enter a Sender Display Name to override the default from
.env.
- Enter the Email Subject. You can use placeholders here (e.g.,
-
Choose Recipient Method:
- Select "Bulk (Upload CSV)".
- Select "Single Recipient".
-
Provide Recipients:
- If Bulk: Upload your
.csvfile. See "Example CSV File" below. - If Single: Enter the recipient's email address in the input field.
- If Bulk: Upload your
-
Add Attachments (Optional):
- Click "Choose Files" and select one or more files to attach.
-
Preview (Recommended):
- Click the "Preview" button to see how the email body will look. Check formatting, especially if using Markdown or complex HTML. (Placeholders are not replaced in the preview).
-
Send:
- Click the "Send Email(s)" button. A loading indicator will appear.
-
Review Results:
- You'll be redirected to the results page.
- Check the summary status in the flash message and the navbar.
- Review the detailed log for the status of each individual email (Success, Failed, Skipped). Error messages will be shown for failures.
-
Go Back: Click "Go Back & Send More" to return to the main form.
When using the "Bulk (Upload CSV)" option, your CSV file structure is crucial.
- Required Header: It MUST contain a column header for email addresses. The application looks for common names like
email,email address,email_address,e-mail, orrecipient(case-insensitive). It will also try to find any header containingmailif the common ones aren't present. - Optional Headers: Any other column headers can be used as variables for personalization in your subject and email body.
- Encoding: UTF-8 encoding (with or without BOM) is recommended. Latin-1 is supported as a fallback.
- Delimiter: Standard comma (
,) delimiter is expected. The app attempts to sniff the dialect but defaults to comma-separated.
Example recipients.csv file:
Email,FirstName,LastName,Product,DiscountCode
[email protected],Alice,Smith,SuperWidget,SUMMER20
[email protected],Bob,Jones,MegaGadget,WELCOME10
[email protected],Charlie,Brown,TurboTool,
[email protected],Diana,Prince,SuperWidget,SAVEBIG5
,"","",,""  # Example of a potentially empty row (will be skipped)
[email protected],Frank,,,SAVE15 # Example with missing data
Key points from the example:
- The
Emailcolumn is present and contains the recipient addresses. FirstName,LastName,Product,DiscountCodeare optional headers used for personalization.- Some rows might have missing data (like Charlie's DiscountCode or Frank's LastName/Product). The corresponding placeholder will be replaced with an empty string.
- Empty rows are skipped automatically.
You can personalize both the Subject and the Email Body using data from your CSV file (when in Bulk mode).
- Syntax: Use
$followed by the header name (e.g.,$firstname) OR${header_name}(e.g.,${product}). The curly brace syntax${...}is useful if the placeholder is immediately followed by other characters that could be mistaken as part of the name (e.g.,${product}s). - Matching: The placeholder name MUST exactly match a column header in your CSV file, but the match is case-insensitive. So,
$firstname,$FirstName, and${FIRSTNAME}will all correctly pull data from theFirstNamecolumn in the example CSV above. - Replacement: Before sending each email, the application replaces every placeholder it finds with the corresponding value from that recipient's row in the CSV.
- Missing Data: If a placeholder exists in your template but the corresponding column is missing in the CSV or the cell is empty for a specific recipient, the placeholder will be replaced with an empty string (nothing).
Example Usage (based on the CSV above):
- Subject Input:
Special Offer for $FirstName on ${Product}!- For Alice:
Special Offer for Alice on SuperWidget! - For Bob:
Special Offer for Bob on MegaGadget!
- For Alice:
- Email Body Content (HTML example):
<p>Hi $FirstName $LastName,</p>
<p>Thanks for your interest in the ${Product}. As a valued customer, use code <strong>$DiscountCode</strong> for a special discount!</p>
<p>Best regards,<br>The Team</p>
- For Alice: Renders with "Hi Alice Smith," ... "code SUMMER20..."
- For Charlie: Renders with "Hi Charlie Brown," ... "code ..." (empty string for DiscountCode)
Important: Variables are NOT replaced in the live Preview. The preview shows the raw template with placeholders intact.
The application follows this logic to set the subject line for each email:
- User Input Field: If you type anything into the "Email Subject" field on the form, that text is used as the template. Placeholders (like
$FirstName) within this input will be processed using the CSV data for each recipient. <title>Tag (HTML Upload/Draft): If the "Email Subject" field is left empty AND the email content is determined to be HTML (either uploaded.html/.htmor drafted HTML), the application looks for a<title>Your Subject Here</title>tag within the HTML content. If found, the text inside the title tag is used as the subject. Placeholders are not processed if the subject is extracted this way.- First Non-Empty Line (Markdown/Text Upload or Fallback): If the subject field is empty AND no
<title>tag is found (or the content is Markdown/Text), the application attempts to use the first non-empty, non-HTML-tag-like line from the email content as the subject. Placeholders are not processed if the subject is extracted this way. - Default Subject: If none of the above methods yield a subject (e.g., the content starts immediately with HTML tags and has no title, and the subject field was empty), a generic default subject like
"Your Default Sender Name Information"(using thedisplay_namefrom.envor the custom one) will be used.
Recommendation: For maximum control and personalization, always specify your desired subject in the "Email Subject" form field, using placeholders as needed.
web-bulk-email-sender/
├── .env                 # Your SMTP config & secrets (!!! NOT COMMITTED !!!)
├── .env.example         # Example environment file structure
├── app.py               # Main Flask application logic (routing, email sending)
├── requirements.txt     # Python package dependencies
├── readme.md            # This file
└── templates/
    ├── index.html       # Main form UI (editor, options, preview)
    └── result.html      # Status/result log page
# Ensure you are in the project directory and your virtualenv is active
python app.py
By default, it runs on http://127.0.0.1:5000. The host='0.0.0.0' setting in app.py makes it accessible from other devices on your local network using your computer's local IP address (e.g., http://192.168.1.100:5000).
We welcome contributions from the community! Whether it's fixing a bug, improving documentation, adding a new feature, or suggesting an idea, your help is appreciated.
- Find an Issue or Feature: Look through the existing GitHub Issues or propose a new idea. Discussing your plan in an issue first is often a good idea.
- Fork the Repository: Create your own copy of the project on GitHub (https://github.com/SupratimRK/web-bulk-email-sender).
- Create a Branch: Make a new branch in your fork for your changes:
git checkout -b feature/your-awesome-feature # Or fix/address-specific-bug - Develop & Test: Make your code changes. Add tests if applicable. Ensure the application runs correctly and your changes integrate well. Follow existing code style.
- Commit Your Changes: Use clear and descriptive commit messages:
git commit -m "feat: Add template saving functionality" -m "Implemented feature X, allowing users to save drafts..."
- Push to Your Fork:
git push origin feature/your-awesome-feature
- Open a Pull Request (PR): Go to the original repository (https://github.com/SupratimRK/web-bulk-email-sender) and open a PR from your branch to the
mainbranch. - Describe Your PR: Clearly explain the purpose of your changes, what issue it fixes (e.g.,
Closes #123), and any specific testing instructions.
This project has room to grow! Here are some ideas that contributors could tackle:
- 📨 Template Management: Allow users to save, load, and manage email templates directly within the UI.
- 🚦 Rate Limiting Control: Add UI options to configure delays between sending emails to respect SMTP server limits.
- ✅ Enhanced CSV Validation/Preview: Show a preview of parsed CSV data before sending, highlighting potential issues or the identified 'email' column.
- 🐳 Dockerization: Create
Dockerfileanddocker-compose.ymlfor easier setup and deployment. - 🎨 UI Themes/Customization: Add options for different visual themes or allow minor UI tweaks.
- 👥 Simple Contact List Management: Beyond single CSV uploads, potentially add basic list storage/management.
If you're interested in working on any of these, please open an issue on the GitHub repository to discuss the approach first!
- Original Concept Inspiration: aahnik/bulk-email-sender
- Framework: Flask
- Frontend Styling: Bootstrap, Bootstrap Icons
- Rich Text Editor: Quill.js
- Markdown Rendering: Marked.js, Python-Markdown
- HTML to Text: html2text
This project is licensed under the MIT License. See the LICENSE file (if included) or the standard MIT License text for details. Feel free to use, modify, and distribute it as you see fit, but please provide attribution.